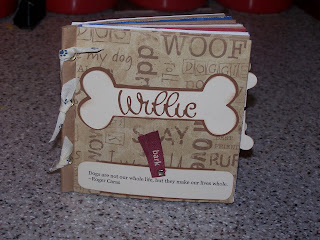
 Front of book
Thursday, September 30, 2010
Monday, September 20, 2010
Birthday Cards
 Card from my mom
 Card from me and my family.
These are the two cards I made for Lily's first birthday. As you can see they go with the theme of her banner. Be sure to check out the banner post for more pics of it hanging at the party. These cards are kinda plain since I was pressed for time. Still they are pretty cute. Both cards are cut using Sweet Treats.
Paint Can
 Top of can
 Ribbons on the handle

I went back and forth as to how to decorate Rosie's can. I finally decided to do a shabby chic style and I really like how it turned out. I wish I could take responsibility for for the flowers but they were store bought. I just love how it all came together though. I was so glad that Rosie loved everything! She made me an awesome can and great goodies too. I am a very lucky girl!
Post It Note Holder

Made this for Rosie as well. I need to figure out how to get the paper cut closer to the coaster but I think for a start it turned out ok.
Paper Bag Album

These are the insert tags I did. There are two of each of them.

Back pages


inside cover
(Sorry I put these in the wrong order. I need to pay better attention but not tonight.)
I made my very first paper bag album for my friend Rosie. I did it for her dog Willie. I used a bunch of different cricut cuts, inked it, and put a bunch of dog qoutes in it. I really think I will make more of these albums. So fun to make!
Labels:
Animal Kingdom,
Create A Critter,
Lyrical Letters,
Storybook
Altered Treat Jar
 Top of the lid. I don't think the picture shows how cool it really looks.
Front of the jar.
 Side of jar with the two different ribbons.
I participated in my first Gibbs swap on the mb and we had to make at least 2 homemade goodies along with a paint can. I made this treat jar for Rosie's dog Willie. I used alcohal ink on the lid and then did the tag with an oval cut, cut the word Treats with my ds and then stickled them with gold. I attached them with two different ribbons.
Home Sweet Home ATC

I made this for a swap that my friend Kay hosted on the cricut MB. The theme was Home Sweet Home. I think this turned out pretty cute. Have I mentioned that I'm addicted to these little things?
Tuesday, September 7, 2010
Happy Birthday Banner
 Whole banner hanging in the tent


My friend's daughter is turning 1 in two weeks. I offered to make her a banner. She is having the party at an ice cream shop. The main colors are chocolate, vanilla and strawberry. I cut the vanilla scallops from the mini monogram cart at 5.5 inches and the strawberry and chocolate scallops at 5 inches. I used Storybook for the letters at 3.5 inches (I believe) using polka dot paper that had all 3 colors plus a few others. The 1 with the flame is from Sweet treats as are all of the other cut images except for the soda which is from From my kitchen. I used a lot of stickles. I then used eyelets on the sides and put the cutest ribbon between the scallops to connect them. I will hopefully have a better picture of the whole thing once its up for the party.
PLEASE EXCUSE MY DIRTY/MESSY CRAFT ROOM.
Labels:
Banner,
From My Kitchen,
Mini Monograms,
Storybook,
Sweet Treats
My First ATC

So I made this first ATC about 6 months ago. For whatever reason I never took a picture of it. We had to create something that had to do with the initial of our name. I named mine Ladybugs in Love. I used red card stock as my base. I used the pink to dry emboss the hearts. I cut out two ladybugs from Walk In My Garden. Used Stickles, a white and black ribbon and the cutest little red heart button. I think they turned out cute for being the first ones I ever made.
Trees

So we were given a challenge to create whatever we wanted so long as a tree was the main element. As everyone knows I LOVE trees so this was perfect for me. From the beginning I knew I wanted to make a tag and I knew the design I wanted. Unfortunately, my paper and my cricut couldn't play nice so I had to go on to PLAN B. Honestly, I love the way it turned out.
I cut the tag at 3 inches. Tore the black paper to make it look weathered. I used black eyelets for the top of the tag. I used a tree stamp that I got over a year ago in the dollar bins at JoAnn's. I stamped my image and then heat embossed it. Used embroidery floss for the top of the tag. I do love the way they turned out.
MIA
Sorry I was MIA. I had both computer issues and also a missing camera. Its a good thing I never threw out my previous camera! I still can't find my "good" one. The computer is fixed and the "old" camera is serving its purpose so I'm backkkkkkkk
Subscribe to:
Comments (Atom)


